CAReplicatorLayer is one of the more interesting toys in the Core Animation toolbox: feed it one or more sublayers (an image, a rendered shape, whatever) and it will copy – replicate – those sublayers and then do stuff with the copies in time and space.
Animated activity indicators are a typical use, but that’s just scratching the surface (see, for example, Facebook’s experimental spacetime library, which uses CAReplicatorLayer and the CMMediaTiming protocol to transform individual parts of layers in real time.)
I happen to think replicator layers are particularly well suited to audio-related interfaces because their visual properties in many ways parallel the cylical nature of music and sound.
There’s one thing, however, that CAReplicatorLayer can’t do, and that’s: provide you with direct access to the copies it creates.
For good reason: CAReplicatorLayer does what it does by compositing directly to the GPU. So there’s no secret array of layer objects hidden away somewhere, waiting for you to reach in and start messing with them. (On the other hand: we did say “directly to the GPU.” CAReplicatorLayer is very efficient.)
Still, there are times when you’d like to do something a little more interactive with your replicated elements. You might, for example, want to have some action – triggered either by the user or by some internal source – act independently on each element.
Like so:

This kind of thing is not too difficult to set up. And while it’s not a true replacement for CAReplicator, it can be an effective alternative in the right situations.
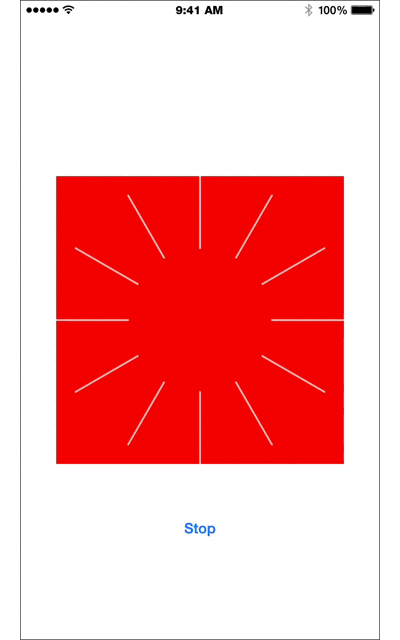
To demonstrate, let’s create a simple app that triggers an animation on randomly selected elements of a custom replicator layer. The final result will look something like this:
We begin by creating a new iOS Single View Application in Xcode.
Next, create a new file, call it MOJOReplicatorLayer, make it a subclass of CALayer and add the following to it:
class MOJOReplicatorLayer: CALayer {

  var instanceShape : CAShapeLayer! {
    didSet {
      updateLayers()
    }
  }

  var instanceCount : Int = 4 {
    didSet {
      updateLayers()
    }
  }

  var instanceArray = [CAShapeLayer]()

  func updateLayers()
  {
  }

}
Pretty simple: we’ve given our MOJOReplicatorLayer class a handful of properties:
- instanceCount, to hold the number of copies we want (default = 4);
- instanceShape, to hold the shape layer we’d like to replicate; and
- instanceLayers – an array of
CAShapeLayers – to provide us with access to the individual copies.
We’ve also declared an updateLayers() function to lay things out whenever instanceCount or instanceShape are set. Let’s fill out that function next:
   func updateLayers()
  {
    // 1. Check if we have an existing set of replicated sublayers, zap it (along with the contents of the instanceLayers array) if we do
    if self.sublayers != nil {
      self.sublayers.removeAll(keepCapacity: false)
      self.instanceLayers.removeAll(keepCapacity: false)
    }
    // 2. Calculate a rotation angle based on instanceCount
    var angle = Float(M_PI * 2.0) / Float(instanceCount)
    // 3. Create a sublayer for each instance
    for index in 1...self.instanceCount {
      // configure a new shape layer
      var layer = CAShapeLayer()
      layer.frame = self.bounds
      layer.backgroundColor = UIColor.clearColor().CGColor
      // if instanceShape exists, copy its properties over to the new layer
      if self.instanceShape != nil {
        layer.strokeColor = instanceShape.strokeColor
        layer.opacity = instanceShape.opacity
        layer.lineWidth = instanceShape.lineWidth
        layer.lineCap = instanceShape.lineCap
        layer.path = instanceShape.path
      } else {
        // otherwise, set the layer's properties to some reasonable defaults
        layer.strokeColor = UIColor.whiteColor().CGColor
        layer.lineWidth = 2.0
        layer.lineCap = kCALineCapRound
        let path = UIBezierPath()
        path.moveToPoint(CGPoint(x: self.bounds.size.width / 2.0, y: self.bounds.size.height / 2.0))
        path.addLineToPoint(CGPoint(x: self.bounds.size.width / 2.0, y: 0))
        layer.path = path.CGPath
      }
      // 4. Apply a rotation transform to the layer, based on our calculated angle
      layer.transform = CATransform3DMakeRotation(CGFloat(Float(index) * angle), 0.0, 0.0, 1.0)
      // 5. Store a reference to the layer in our instanceLayers array...
      instanceLayers.append(layer)
      // 6. And, finally, add the shape layer to self
      self.addSublayer(layer)
    }
  }
Hopefully the comments speak for themselves.
One thing to note is the way we’re creating our duplicate layers from instanceShape. It would be nice if we could just do this for each new layer:
var layer = instanceShape
But we can’t. CALayer and its subclasses don’t implement the NSCopying protocol, so you can’t just do a simple assignment like that to make our copies. If we were to try, we’d find that all further manipulations end up being applied to the single, original shapeLayer.
So instead, we just manually copy over instanceShape’s properties to each new layer.
And that’s it for our custom replicator layer!
Next, create another new file, call it MOJOReplicatorView, make it a subclass of UIView and modify it to look like this:
  class MOJOReplicatorView: UIView {

  var replicator : MOJOReplicatorLayer!

  required init(coder aDecoder: NSCoder) {
    super.init(coder: aDecoder)

    setup()
  }

  func setup()
  {
  }

  func animate()
  {
  }

}
Again, there’s nothing too complex here. We’ve got an instance of our MOJOReplicatorLayer and a pair of functions, one to set up our replicator and the other to handle animations.
Let’s take care of setup() first. Add the following:
    // 1. Configure a shape layer
    let shapeLayer = CAShapeLayer()
    shapeLayer.frame = CGRect(x: self.bounds.size.width / 2.0, y: 0, width: 1, height: self.bounds.size.height)
    shapeLayer.lineCap = kCALineCapRound
    shapeLayer.lineWidth = 1.0
    shapeLayer.strokeColor = UIColor.whiteColor().CGColor
    shapeLayer.opacity = 0.7
    let path = UIBezierPath()
    path.moveToPoint(CGPoint(x: self.bounds.size.width / 2.0, y: 0))
    path.addLineToPoint(CGPoint(x: self.bounds.size.width / 2.0, y: self.bounds.size.height / 4.0))
    shapeLayer.path = path.CGPath

    // 2. Configure a replicator with the shape layer we just set up, and tell it how many copies to make
    replicator = MOJOReplicatorLayer()
    replicator.frame = self.bounds
    replicator.instanceShape = shapeLayer
    replicator.instanceCount = 12

    // 3. Attach our replicator as a sublayer
    self.layer.addSublayer(replicator)
Easy as 1–2–3:
- we create and configure a shape layer to replicate.
- we create a MOJOReplicatorLayer, set its frame to the view’s bounds, set its instanceShape the shape layer we just created, and set the instanceCount to 12.
- we add the configured replicator to our view’s backing layer.
Now, fill in animate():
  func animate()
  {
    // 1. Set up a pair of animation blocks
    let lineWidthAnimation = CABasicAnimation(keyPath: "lineWidth")
    lineWidthAnimation.duration = 0.15
    lineWidthAnimation.fromValue = replicator.instanceLayers[Int(0)].lineWidth
    lineWidthAnimation.toValue = replicator.instanceLayers[Int(0)].lineWidth * 3.0
    lineWidthAnimation.timingFunction = CAMediaTimingFunction(name: kCAMediaTimingFunctionEaseInEaseOut)
    lineWidthAnimation.autoreverses = true

    let opacityAnimation = CABasicAnimation(keyPath: "opacity")
    opacityAnimation.duration = 0.15
    opacityAnimation.fromValue = 0.7
    opacityAnimation.toValue = 1.0
    opacityAnimation.timingFunction = CAMediaTimingFunction(name: kCAMediaTimingFunctionEaseInEaseOut)
    opacityAnimation.autoreverses = true

    // 2. Group the animations into an animation group
    let animationGroup = CAAnimationGroup()
    animationGroup.duration = 0.3
    animationGroup.animations = [lineWidthAnimation, opacityAnimation]

    // 3. Retrieve our replicator's layer count, and generate a random value within its range
    let count = UInt32(replicator.instanceLayers.count)
    let rand = arc4random() % count

    // 4. Add the animation group to our randomly selected layer
      replicator.instanceLayers[Int(rand)].addAnimation(animationGroup, forKey: nil)
  }
The code at (1) and (2) just sets up a pair of animation blocks and then combines them into an animation group. Then at (3) we get our replicator’s instanceCount and generate a random number within its range of values. Finally, at (4) we add our animations to the layer residing at that random index in the replicator’s instanceLayers array.
That’s all the hard stuff out of the way!
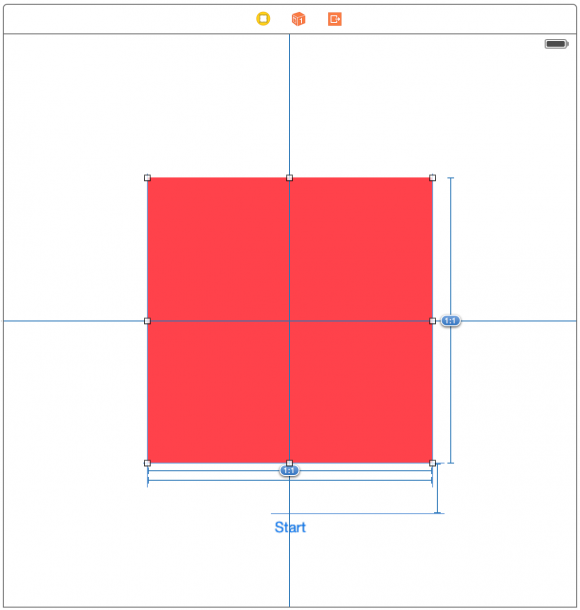
All we need now is to drag a UIView and a UIButton into our storyboard, set up some contraints to keep things in place, and set the view’s class (in the Identity Inspector) to MOJOReplicatorView. Here’s what mine looks like:
Finally, add the following to ViewController:
  var timer: NSTimer!

  @IBOutlet var replicator: MOJOReplicatorView!

  ...

  @IBAction func animateReplicator(sender: UIButton)
  {
    if sender.titleLabel?.text == "Start" {
      timer = NSTimer.scheduledTimerWithTimeInterval(0.3, target: replicator, selector: "animate", userInfo: nil, repeats: true)
      sender.setTitle("Stop", forState: .Normal)
    } else {
      timer.invalidate()
      sender.setTitle("Start", forState: .Normal)
    }
  }
This sets up an IBOutlet to the replicator view and a simple timer for triggering its animate()function.
We’ve also added an animateReplicator() action method to toggle the timer on and off. Toggled on, it sets the timer running with calls to animate() about 3 times per second. Toggled off, it kills the timer.
And with that we’re just about done. Head back over to Interface Builder, wire up the replicator view to the replicator outlet, and the button to the animateReplictor() action, and give it a spin.
Twinkle twinkle!
Github project can be found here.
![]()